Archivi categoria: WikiNotes

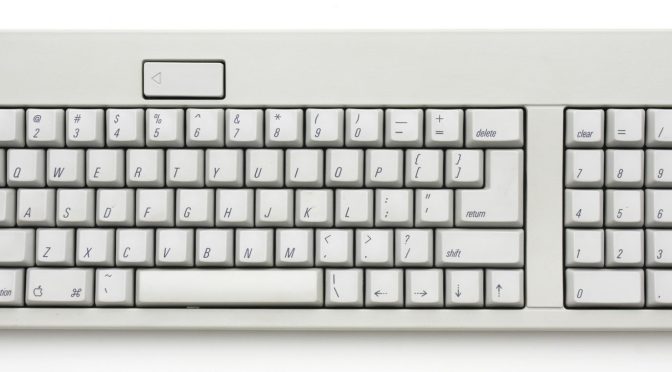
Macintosh startup key sequences

This is a collection of the (poorly documented) key-sequences that do things. It’s probably possible to find all this information within Apple’s Knowledge Base, but it’s currently scattered across multiple entries. In any case, this came from a number of smart people, but Marc Pawliger started the list and Tim Hume collected the various responses. Miro, Andy, Darin, Chris, Barry, the other Marc, Greg, Jon and Ned offered clarifications. I just turned it into a web-page.

It’s pretty sad that there are so many “hidden” things in an OS that’s supposed to be so easy to use. I hadn’t thought about it before, but the sheer volume of them has surprised me. I knew of the existence of a lot of these shortcuts myself, but I’d never tried to think of them all at once until I started compiling this page. Now that I have many of them in one place (there’s more to be added – I think there always will be), I find myself wondering about ease of use. Anyway, enjoy.

On boot

Key CombinationEffect
mouse downEject removable media ( I think Boot ROMs prior to 2.4f1 excluded the CD drive )
optBring up OF system picker on New World machines – boot to 9 on pre-New World machines
F8Bring up Mac OS X boot partition selector (DTKs only?)
cmd-periodWhen OF system picker is active, open the CD tray
cmd-optHold down until 2nd chime, will boot into Mac OS 9 ?
cmd-x (or just x?)Will boot into Mac OS X if 9 and X are on the same partition and that’s the partition you’re booting from.
cmd-opt-n-dprevent native drivers from loading (System 7 until 9.x?)
cmd-opt-shift-deleteBypass startup drive and boot from external (or CD). This actually forces the system to NOT load the driver for the default volume, which has the side effect mentioned above. For SCSI devices it searches from highest ID to lowest for a partition with a bootable system. Not sure about IDE drives.
cmd-opt-shift-delete-#Boot from a specific SCSI ID # (# = SCSI ID number)
cmd-opt-p-rZap PRAM. Hold down until second chime.
cmd-opt-n-vClear NV RAM. Similar to reset-all in Open Firmware.
cmd-opt-o-fBoot into open firmware
cmd-opt-t-vForce Quadra AV machines to use TV as a monitor
cmd-opt-x-oBoot from ROM (Mac Classic only)
cmd-opt-a-vForce an AV monitor to be recognized as one
cBoot from CD. If set to boot to X and no CD is present, may boot to 9.
dForce the internal hard disk to be the startup device
nHold down until Mac logo, will attempt to boot from network server (using BOOTP or TFTP)
rForce PowerBooks to reset the screen
tPut FireWire machine into FireWire Target Disk mode
zAttempt to boot using the devalias zip from first bootable partition found
ctl-cmd-shift-powerReset power manager (with computer off)
shift(Classic only) Disable Extensions
shift(OS X, 10.1.3 and later) Disables login items. Also disables non-essential kernel extensions (safe boot mode)
cmd(Classic only) Boot with Virtual Memory off
cmd-v(OS X only) show console messages (verbose mose) during boot. Also invokes Safe Mode
cmd-s(OS X only) boot into single user mode
cmd-opt-c-i(Mac IIci only) Set date to 20 Sep 1989 to get a graphical easter egg
cmd-opt-f-x(Mac IIfx only) Set date to 19 Mar 1990 to get a graphical easter egg
cmd-opt-shift-tab-deleteErase startup disk under 7.1(?)

After display of Happy Mac icon

Key CombinationEffect
space(Classic only) Invoke Extensions Manager
shift(Classic only) Disable Extensions including MacsBug
shift-opt(Classic only) Disable exetensions, except MacsBug
ctrl(Classic only) Break into MacsBug as soon as it is loaded

At login window

Key CombinationEffect
shift(10.x only) Disable auto-login, forcing login window

As Finder Starts

Key CombinationEffect
cmd-opt(whenever Classic Finder sees a new disk) Rebuild Desktop
opt(Mac OS 9) Do not open Finder windows
shift(Mac OS X) Do not launch startup items. Do not open Finder windows when launching Finder. The windows’ states aren’t changed to closed, as they will be reopened if you reboot again.
shift(Mac OS 9) Do not launch anything from the “Startup Items” folder.

In Finder

Key CombinationEffect
opt-click close box (or cmd-opt-w)Close all open finder windows (except popup windows)
cmd-shift-opt-wClose all open finder windows (including popup windows)
cmd-right arrowOpen folder in list view
cmd-opt-right arrowRecursively open folder and nested folders in list view
cmd-left arrowClose folder in list view
cmd-opt-left arrowRecursively close folder and nested folders in list view
cmd-up arrowOpen parent folder. On Mac OS X, when nothing is selected and no windows are open, open User directory
cmd-opt-up arrowOpen parent folder, closing current folder
cmd-opt-shift-up arrowMake desktop the active window, select parent volume
cmd-down arrowOpen selected item. On Mac OS X, when nothing is selected and no windows are open, open the desktop folder
cmd-opt-down arrowOpen selected item, closing current folder
cmd-opt-oOpen selected item, closing current folder
opt-double-clickOpen selected item, closing current folder
opt-click(In disclosure triangle) expand or collapse all folders within that window
tabselect next icon alphabetically
shift-tabselect previous item alphabetically
cmd-deletemove selection to trash
cmd-shift-deleteempty trash
spacewhile navigating, opens folder under mouse immediately (with spring-loaded folders enabled)
In Finder Window Menu
cmd-selectClose window
cmd-shift-selectPut away popup window
cmd-opt-selectExpand selected window and close all others
ctl-selectExpand selected window and collapse all others
ctl-opt-selectActivate selected window and expand all others

On disk mount

Key CombinationEffect
md-opt(whenever Classic Finder sees a new disk) Rebuild Desktop
opt(Mac OS 9) Add session numbers (;1, ;2, etc) to ISO-9660 CD filenames
opt(Mac OS X) Show each session on an ISO-9660 CD as a volume
cmd-opt-iForce-mount ISO-9660 partition of a CD, rather than a Mac partition

After startup

Key CombinationEffect
On machines with a power key
powerBring up dialog for shutdown, sleep or restart (see next table)
cmd-ctrl-powerUnconditionally reboot (sometimes referred to as “control flower power” to easily remember) (dirty reboot – may corrupt disk)
ctrl-cmd-opt-powerFast shutdown
cmd-powerBring up debugger (if debugger installed). Really old macs (mac ii era) needed Paul Mercer’s debugger init to do this, then it got folded into the firmware, around 040 timeframe.
cmd-opt-powerPut late model PowerBooks & Desktops to sleep
cmd-opt-ctrl-power(PowerBook 500) Reset Power Manager
shift-fn-ctrl-power(PowerBook G3, G4) Reset Power Manager
On machines without a power key
ctrl-ejectBring up dialog for shutdown, sleep or restart (see next table)
cmd-ctrl-ejectUnconditionally reboot
ctrl-cmd-opt-ejectFast shutdown
cmd-ejectBring up debugger (if debugger installed). Really old macs (mac ii era) needed Paul Mercer’s debugger init to do this, then it got folded into the firmware, around 040 timeframe.
cmd-opt-ejectPut late model PowerBooks & Desktops to sleep
On all machines
cmd-opt-escForce quit current app
cmd-shift-0Put late model PowerBooks & Desktops to sleep No longer work in OS X. On Macs with three floppy drives (Mac SE) they eject the third floppy disk.
cmd-shift-1 or 2Eject internal or external floppy. Not sure which is which on dual floppy machines (Mac SE, Mac II, etc.)
cmd-shift-3Screen shot
cmd-shift-4Abstract user defined area screen shot (hold control while selecting to direct it to the clipboard on Mac OS 9)
cmd-shift-capslock-4(Classic only) User selectable window screen shot
cmd-ctl-shift-3Screen shot to clipboard
cmd-ctl-shift-4Abstract user defined area screen shot to clipboard
cmd-ctl-shift-capslock-4(Classic only) User selectable window screen shot to clipboard (classic only)
cmd-tabSwitch apps (possible to change key in Mac OS 8-9)
cmd-shift-tabSwitch apps in reverse order
cmd-spaceSwitch keyboards/script systems (if more than one is installed)
cmd-opt-spaceswitch through all keyboards in keyboards menu
opt-f3, opt-f4 or opt-f5bring up the system preferences (Mac OS X only – maybe powerbooks only? only if system preferences isn’t already running)
cmd-f1toggle between video mirroring and extended desktop mode (works on Ti Powerbooks)
opt-f1open the displays preference (10.2 and later)
cmd-f2auto-detect a newly-connected display (works on Ti Powerbooks)
opt-f2open the displays preference (10.2 and later)
opt-f3, f4, or f5open the Sounds preference (10.2 and later)
opt-f8, f9, or f10open the Keyboard and Mouse preference (10.2 and later)
f12Eject CD/DVD (must be held down on 10.1.2 or later). If the device can be dismounted, it is. If not, nothing happens.
f14dim display (cubes/g4 iMacs/others?)
f15brighten display (cubes/g4 iMacs/others?)
cmd-ctl-shift-0Spin down HD (when possible) on machines running OS 9
cmd-`cycle through current application’s windows (Mac OS X 10.2 only?)
cmd-~cycle through current application’s windows (reverse order) (Mac OS X 10.2 only?)
opt-“Empty Trash”Emptry trash without locked file or contents summary alert. Empties locked items, as well
cmd-opt-D(Mac OS X only) toggle dock
cmd-opt (when opening chooser)(Mac OS 9 only) rebuild chooser cache of printer driver information
cmd-opt-ctl-8(Mac OS X, 10.2 or later) Turn on “Inverse Mode” via accessbility.
cmd-opt-8(Mac OS X, 10.2 or later) Turn on “Zoom Mode” via accessbility.
cmd-opt-plus(Mac OS X, 10.2 or later) Zoom In via accessbility.
cmd-opt-minus(Mac OS X, 10.2 or later) Zoom Out via accessbility.

In the sleep/restart dialog

Key CombinationEffect
SSleep
RRestart
esccancel
cmd-. (period)cancel
Return or EnterShut Down
PowerCancel (9.2.x only?)

In other dialogs

Key CombinationEffect
escCancel
command-. (period)Cancel
enterDefault button
returnDefault button (if there are no text fields that use return
cmd-dDon’t save (in save/cancel/don’t save dialog)
cmd-rReplace (in “Do you want to replace this file” dialog, Mac OS X only)

On keyboards with a function key

Key CombinationEffect
fn-backspaceforward delete
fn-left arrowhome
fn-right arrowend
fn-up arrowpage up
fn-down arrowpage down

Clicks

Click /ModifierEffect
option-click in another applicationSwitch to that application and hide previous app
cmd-drag (window)Drag window without bringing it to front (requires application support to work behind dialogs)
cmd-drag (window background)Pan contents of window with hand (Finder)
cmd-opt-drag (window background)Option may be needed to pan contents of window with hand (Finder) on 10.3 and later
cmd-drag (Mac OS X)Rearrange menu extras
opt-drag (file)Copy file
cmd-opt-drag (file)Make alias of file
cmd-click window titlePop-up menu showing path to current folder/document (in some applications)
option-windowshadeWindowshade all windows of application (classic only)
option-zoomZoom window to full-screen
option-yellowDock all windows of application (Mac OS X only)
option-greenZoom window to fill screen (in some applications)
Mac OS X only – items in dock
cmd-clickReveal in Finder
cmd-opt-clickActivate app and hide other apps
ctl-click (or click and hold)contextual menu
cmd-drag into dockFreeze current dock items from moving so icon can be dropped onto an app
cmd-opt-drag into dockForce application you’re dropping onto to open dropped item

Control Strip

ActionEffect
opt-drag control stripMove control strip
opt-drag CS module within stripreorders CS modules
opt-drag CS module to trashuninstalls a module
opt-drag CS module elsewherewhatever dragging the module file itself would

Installare un server svn su debian 10/9/8

SVN è un sistema open source di controllo della versione creato dalla Apache Foundation Team. Permette di tenere traccia di tutte le modifiche effettuate su una raccolta di file e cartelle. Ogni volta che modifichi, aggiungi o elimini un file o una cartella dentro un repository locale che gestisci con Subversion e invii queste modifiche al tuo repository Subversion sul server, viene creata una nuova revisione che riflette queste modifiche. Subversion permette di tornare sempre indietro, guardare e ottenere il contenuto delle revisioni precedenti.

Anche se Subversion è in grado di gestire qualunque genere di file (sia di testo che binario) viene usato in modo particolare con i repository contenente codice sorgente.

Vediamo come si configura Subversion (svn) su un server basato sui sistemi operativi Debian 10, Debian 9 e Debian 8.

1° passo: installare Apache

Per prima cosa occorre installare il server web Apache, necessario ai moduli di Subversion che installeremo successivamente. Aprire quindi una console dei comandi e digitare in sequenza:

$ sudo apt-get update
$ sudo apt-get install apache2

2° passo: installare SVN

Procediamo con l’installazione dei pacchetti di Subversion. Dopodiché riavviamo anche il server Apache:

$ sudo apt-get install subversion libapache2-mod-svn libapache2-svn libsvn-dev
$ sudo a2enmod dav sudo a2enmod dav_svn
$ sudo service apache2 restart

3° passo: configurare Apache e SVN

Adesso occorre modificare alcuni file di configurazione per abilitare le funzioni necessarie. Editiamo per primo il file /etc/apache2/mods-enabled/dav_svn.conf e aggiungiamo le seguenti righe:

<Location /svn>
   DAV svn
   SVNParentPath /var/lib/svn

   AuthType Basic
   AuthName "Subversion Repository"
   AuthUserFile /etc/apache2/dav_svn.passwd
   Require valid-user
</Location>

4° passo: creare il repository SVN

Adesso digitare i seguenti comandi per creare il nostro repository usando il nome myrepo. Naturalmente usatene uno più adatto alle vostre esigenze:

$ sudo mkdir -p /var/lib/svn/
$ sudo svnadmin create /var/lib/svn/myrepo

$ sudo chown -R www-data:www-data /var/lib/svn
$ sudo chmod -R 775 /var/lib/svn

5° passo: creare gli utenti

E’ possibile limitare e proteggere il nostro repository limitandone l’accesso solo agli utenti autorizzati. Scriviamo questi comandi per creare il primo utente:

$ sudo htpasswd -cm /etc/apache2/dav_svn.passwd admin

Aggiungiamo altri utenti:

$ sudo htpasswd -m /etc/apache2/dav_svn.passwd user1
$ sudo htpasswd -m /etc/apache2/dav_svn.passwd user2

6° passo: accedere al repository dal browser web

Apriamo il browser e andiamo al seguente url:

http://example.com/svn/myrepo

Ci verrà chiesto di inserire le nostre credenziali di accesso (nome utente e password).

A questo punto non ci resta che eseguire il checkout del nostro repository in locale, aggiungere e modificare file, quindi inviare le modifiche al server (in gergo commit). Potremmo farlo da riga di comando ma suggerisco di usare gli strumenti integrati degli IDE di sviluppo oppure utilizzare un front-end specifico che si integri con l’ambiente desktop. In ambito Windows suggerisco di usare Tortoise SVN.

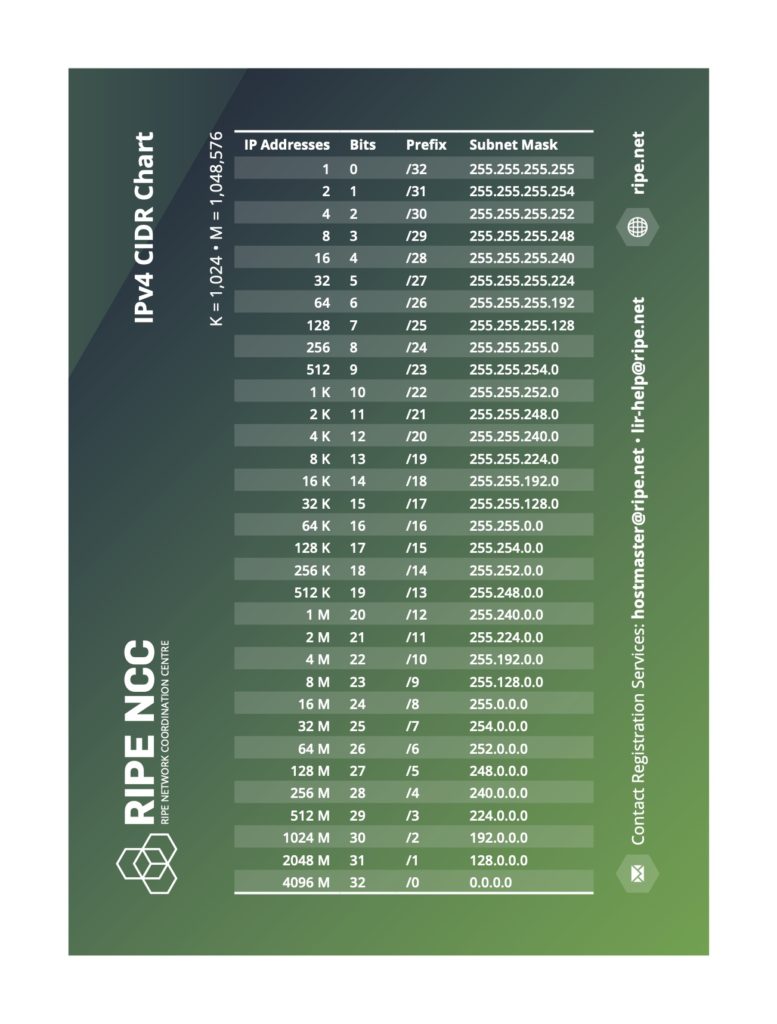
IPv4 CIDR chart

Classless Inter-Domain Routing (CIDR) is a method for allocating IP addresses and IP routing. The Internet Engineering Task Force introduced CIDR in 1993 to replace the previous addressing architecture of classful network design in the Internet. Its goal was to slow the growth of routing tables on routers across the Internet, and to help slow the rapid exhaustion of IPv4 addresses.

IP addresses are described as consisting of two groups of bits in the address: the most significant bits are the network prefix, which identifies a whole network or subnet, and the least significant set forms the host identifier, which specifies a particular interface of a host on that network. This division is used as the basis of traffic routing between IP networks and for address allocation policies.

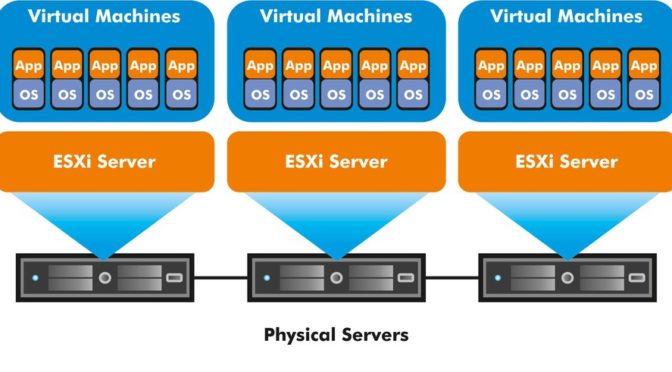
Migrare da KVM/QEMU a VMware ESXi

Una volta che il nostro server con installato VMware ESXi è pronto possiamo iniziare a creare le macchine virtuali.

Nel mio caso ne ho alcune che finora giravano su KVM/QEMU e che vorrei tentare di migrare invece di reinstallarle daccapo. Inizio con quella su cui gira Ubuntu Linux Server 14.04 64 bit.

Copia del disco virtuale

Il mio server KVM (Debian 8.0) utilizza LVM come datastore. Quindi per prima cosa creo uno snapshot (2 GB saranno più che sufficienti per il tempo necessario alla copia dei dati) del disco virtuale vmdisk1 che dovrò poi convertire nel formato VMware.

$ sudo lvcreate --size 2GB --snapshot --name snapdisk1 /dev/kvmstore/vmdisk1
$ sudo qemu-img convert /dev/kvmstore/snapdisk1 -O vmdk /tmp/vmdisk1.tmp.vmdk
$ sudo lvremove -f /dev/kvmstore/snapdisk1

A questo punto trasferire il file provvisorio vmdisk1.tmp.vmdk sul nuovo server (tramite NFS o ssh).

Creazione della macchina virtuale su ESXi

Utilizzare la procedura guidata via web per creare la nuova macchina virtuale, con le impostazioni hardware simili a quelle che avevamo nel nostro vecchio server. La procedura creerà un disco virtuale predefinito che andremo poi a sostituire.

Conversione

Il file così trasferito richiede un’ulteriore conversione prima di poter essere utilizzato dalla macchina virtuale. Se lo facessimo infatti l’avvio della vm fallirebbe restituendo un bel messaggio di errore.

Occorre quindi accedere via shell SSH al server e effettuare la conversione del file temporaneo in quello definitivo:

[root@dellpet440:~] vmkfstools -i vmdisk1.tmp.vmdk -d thin vmdisk1.vmdk
Destination disk format: VMFS thin-provisioned
Cloning disk 'vmdisk1.tmp.vmdk'...
Clone: 100% done.

Possiamo quindi spostare il file definitivo vmdisk1.vmdk nella directory della macchina virtuale, ad esempio /vmfs/volumes/datastore1/mynewvm.

Riconfigurazione e avvio della VM

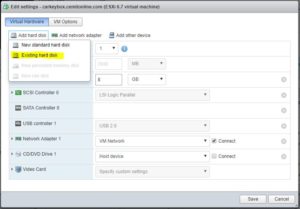
Non ci resta quindi che tornare nella configurazione della VM, eliminare il disco virtuale che il wizard aveva creato e aggiungere un  disco virtuale esistente: andare su Edit > Add Hard Disk > Existing Hard Disk e selezionare il file convertito.

Salvare il tutto, avviare la macchina virtuale e incrociare le dita!

Modificare le regole del firewall in ESXi

Dopo una certa esperienza maturata nell’ambito della virtualizzazione con Linux e KVM/QEMU, ho voluto iniziare a cimentarmi con VMware ESXi 6.7. In realtà non è proprio una novità in quanto già diversi anni fa avevo fatto uso di VMware versioni Workstation (su piattaforma Windows) e Server (su piattaforma Linux).

Come quasi sempre accade quando si affrontano nuovi sistemi, dobbiamo innanzitutto impararne le peculiarità e scontrarsi con i suoi limiti. In questo articolo mi voglio soffermare proprio su uno di questi, ovvero quella della persistenza delle modifiche. Infatti, quelle effettuate tramite shell a basso livello sui file di configurazione, vengono perse ad ogni riavvio del sistema. Ciò è dovuto alla particolare struttura di ESXi ove il file-system viene caricato su RAM e solo una parte di essa viene manutenuta sul disco di boot.

Così succede che per aggiungere una banale regola del firewall come quella di aprire in uscita la porta SMTP (TCP 25) occorre lavorare manualmente sulla configurazione in quanto l’interfaccia web non te lo permette di fare (puoi solo modificare quelle esistenti). In rete ho trovato diverse guide ma non abbastanza chiare in quanto la soluzione cambia da una versione all’altra. Io sono riuscito a rendere persistente la modifica sul mio ESXi 6.7 seguendo questi passaggi. Accetto suggerimenti se esistono soluzioni più eleganti.

Creazione della regola

Per prima cosa occorre creare la regola. Quelle predefinite si trovano nel file /etc/vmware/firewall/services.xml. Alcuni ti suggeriscono di aggungere le tue modifiche in questo file. Io ho preferito adottare una strada leggermente diversa che consiste nell’aggiungere un nuovo file che definisce la regola.

Ho creato così il file /etc/vmware/firewall/smtp.xml:

<ConfigRoot>
  <service id="1000">
    <id>SMTP_Outbound</id>
    <rule>
      <direction>outbound</direction>
      <protocol>tcp</protocol>
      <porttype>dst</porttype>
      <port>25</port>
    </rule>
    <enabled>true</enabled>
    <required>false</required>
  </service>
</ConfigRoot>

Ho riavviato il firewall, sempre da riga di comando:

[root@dellpet440:~] esxcli network firewall refresh

Quindi ho verificato sull’interfaccia web la mia regola appena creata:

Come rendere le modifiche persistenti

Senza entrare troppo nel merito di come funziona ESXi (lo devo ancora capire meglio anch’io) per rendere questa modifica persistente, occorre creare un archivio compresso, contenente il nostro file, che verrà scompattato automaticamente dal sistema ad ogni avvio.

Così ho creato l’archivio compresso smtpfw.tgz contenente il file smtp.xml e l’ho registrato nella cache di boot con l’apposito comando:

[root@dellpet440:~] tar -czvf smtpfw.tgz /etc/vmware/firewall/state.xml
[root@dellpet440:~] BootModuleConfig.sh --add=smtpfw.tgz

Possiamo verificare se l’archivio è stato copiato correttamente nella cache:

[root@dellpet440:~] ls -la /bootbank/smtpfw.tgz
-rwx------ 1 root root 1887 Mar 28 08:54 /bootbank/smtpfw.tgz

Possiamo anche verificare se l’archivio verrà correttamente scompattato all’avvio:

[root@dellpet440:~] cat /bootbank/boot.cfg 
bootstate=0
title=
timeout=5
prefix=
kernel=b.b00
kernelopt=installerDiskDumpSlotSize=2560
modules=jumpstrt.gz --- useropts.gz --- features.gz --- k.b00 --- chardevs.b00 --- user.b00 --- procfs.b00 --- uc_intel.b00 --- uc_amd.b00 --- vmx.v00 --- vim.v00 --- sb.v00 --- s.v00 --- ata_liba.v00 --- ata_pata.v00 --- ata_pata.v01 --- ata_pata.v02 --- ata_pata.v03 --- ata_pata.v04 --- ata_pata.v05 --- ata_pata.v06 --- ata_pata.v07 --- block_cc.v00 --- bnxtnet.v00 --- brcmfcoe.v00 --- char_ran.v00 --- ehci_ehc.v00 --- elxiscsi.v00 --- elxnet.v00 --- hid_hid.v00 --- i40en.v00 --- iavmd.v00 --- igbn.v00 --- ima_qla4.v00 --- ipmi_ipm.v00 --- ipmi_ipm.v01 --- ipmi_ipm.v02 --- iser.v00 --- ixgben.v00 --- lpfc.v00 --- lpnic.v00 --- lsi_mr3.v00 --- lsi_msgp.v00 --- lsi_msgp.v01 --- lsi_msgp.v02 --- misc_cni.v00 --- misc_dri.v00 --- mtip32xx.v00 --- ne1000.v00 --- nenic.v00 --- net_bnx2.v00 --- net_bnx2.v01 --- net_cdc_.v00 --- net_cnic.v00 --- net_e100.v00 --- net_e100.v01 --- net_enic.v00 --- net_fcoe.v00 --- net_forc.v00 --- net_igb.v00 --- net_ixgb.v00 --- net_libf.v00 --- net_mlx4.v00 --- net_mlx4.v01 --- net_nx_n.v00 --- net_tg3.v00 --- net_usbn.v00 --- net_vmxn.v00 --- nhpsa.v00 --- nmlx4_co.v00 --- nmlx4_en.v00 --- nmlx4_rd.v00 --- nmlx5_co.v00 --- nmlx5_rd.v00 --- ntg3.v00 --- nvme.v00 --- nvmxnet3.v00 --- nvmxnet3.v01 --- ohci_usb.v00 --- pvscsi.v00 --- qcnic.v00 --- qedentv.v00 --- qfle3.v00 --- qfle3f.v00 --- qfle3i.v00 --- qflge.v00 --- sata_ahc.v00 --- sata_ata.v00 --- sata_sat.v00 --- sata_sat.v01 --- sata_sat.v02 --- sata_sat.v03 --- sata_sat.v04 --- scsi_aac.v00 --- scsi_adp.v00 --- scsi_aic.v00 --- scsi_bnx.v00 --- scsi_bnx.v01 --- scsi_fni.v00 --- scsi_hps.v00 --- scsi_ips.v00 --- scsi_isc.v00 --- scsi_lib.v00 --- scsi_meg.v00 --- scsi_meg.v01 --- scsi_meg.v02 --- scsi_mpt.v00 --- scsi_mpt.v01 --- scsi_mpt.v02 --- scsi_qla.v00 --- shim_isc.v00 --- shim_isc.v01 --- shim_lib.v00 --- shim_lib.v01 --- shim_lib.v02 --- shim_lib.v03 --- shim_lib.v04 --- shim_lib.v05 --- shim_vmk.v00 --- shim_vmk.v01 --- shim_vmk.v02 --- smartpqi.v00 --- uhci_usb.v00 --- usb_stor.v00 --- usbcore_.v00 --- vmkata.v00 --- vmkfcoe.v00 --- vmkplexe.v00 --- vmkusb.v00 --- vmw_ahci.v00 --- xhci_xhc.v00 --- elx_esx_.v00 --- btldr.t00 --- weaselin.t00 --- esx_dvfi.v00 --- esx_ui.v00 --- lsu_hp_h.v00 --- lsu_lsi_.v00 --- lsu_lsi_.v01 --- lsu_lsi_.v02 --- lsu_lsi_.v03 --- native_m.v00 --- qlnative.v00 --- rste.v00 --- vmware_e.v00 --- vsan.v00 --- vsanheal.v00 --- vsanmgmt.v00 --- payload1.v00 --- xorg.v00 --- imgdb.tgz --- state.tgz --- smtpfw.tgz
build=6.7.0-0.0.8169922
updated=4

Da adesso in poi, ogni volta che riavvieremo il nostro server, il sistema scompatterà il nostro file nella giusta posizione, il resto lo farà il firewall che aggiungerà così la regola.

Come tornare indietro

Sarò sufficiente rimuovere la nostra modifica dalla cache di avvio:

[root@dellpet440:~] BootModuleConfig.sh --remove=smtpfw.tgz

e poi riavviare.

Considerazioni finali

Come già detto, questa è stata l’unica soluzione che mi ha permesso di rendere persistente la mia modifica; non credo sia l’unica e neanche la più elegante. Ho anche il dubbio che venga mantenuta in caso di aggiornamento del sistema.

Un’altra possibilità poteva essere quella di modificare direttamente il file services.xml. Per chi desidera procedere in questo modo deve prima prima modificare i permessi così:

[root@dellpet440:~] chmod 644 /etc/vmware/firewall/services.xml
[root@dellpet440:~] chmod +t /etc/vmware/firewall/services.xml

Se il primo comando risulta quasi ovvio, il secondo merita una spiegazione a parte: secondo quanto trovato in rete, i file di configurazione in ESXi sono tutti in sola lettura e se tentate di modificarne uno senza prima abilitare lo sticky bit il sistema vi negherà il salvataggio delle modifiche anche con i permessi in scrittura. Questo perché il sistema salva automaticamente una copia del file originale che verrà poi confrontata con la versione modificata, al fine di creare un file diff che verrà poi applicato in fase di reboot. A me sinceramente non ha funzionato, non sono sicuro se per un qualche mio errore oppure se nella versione 6.7 è stato cambiato qualcosa. Purtroppo quello che si trova in rete è abbastanza datato e fa riferimento alle versioni 4.x o 5.x.