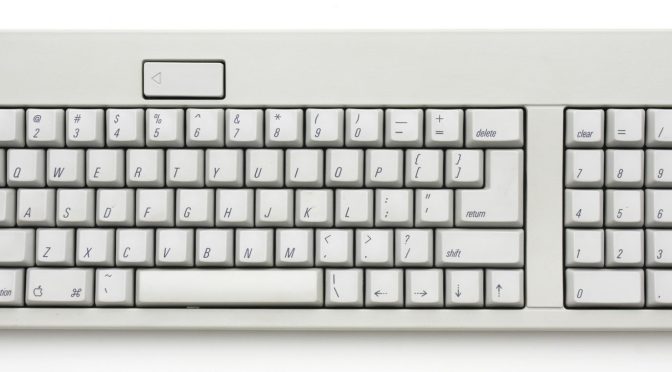
This is a collection of the (poorly documented) key-sequences that do things. It’s probably possible to find all this information within Apple’s Knowledge Base, but it’s currently scattered across multiple entries. In any case, this came from a number of smart people, but Marc Pawliger started the list and Tim Hume collected the various responses. Miro, Andy, Darin, Chris, Barry, the other Marc, Greg, Jon and Ned offered clarifications. I just turned it into a web-page.
It’s pretty sad that there are so many “hidden” things in an OS that’s supposed to be so easy to use. I hadn’t thought about it before, but the sheer volume of them has surprised me. I knew of the existence of a lot of these shortcuts myself, but I’d never tried to think of them all at once until I started compiling this page. Now that I have many of them in one place (there’s more to be added – I think there always will be), I find myself wondering about ease of use. Anyway, enjoy.
On boot
Key Combination
Effect
mouse down
Eject removable media ( I think Boot ROMs prior to 2.4f1 excluded the CD drive )
opt
Bring up OF system picker on New World machines – boot to 9 on pre-New World machines
F8
Bring up Mac OS X boot partition selector (DTKs only?)
cmd-period
When OF system picker is active, open the CD tray
cmd-opt
Hold down until 2nd chime, will boot into Mac OS 9 ?
cmd-x (or just x?)
Will boot into Mac OS X if 9 and X are on the same partition and that’s the partition you’re booting from.
cmd-opt-n-d
prevent native drivers from loading (System 7 until 9.x?)
cmd-opt-shift-delete
Bypass startup drive and boot from external (or CD). This actually forces the system to NOT load the driver for the default volume, which has the side effect mentioned above. For SCSI devices it searches from highest ID to lowest for a partition with a bootable system. Not sure about IDE drives.
cmd-opt-shift-delete-#
Boot from a specific SCSI ID # (# = SCSI ID number)
cmd-opt-p-r
Zap PRAM. Hold down until second chime.
cmd-opt-n-v
Clear NV RAM. Similar to reset-all in Open Firmware.
cmd-opt-o-f
Boot into open firmware
cmd-opt-t-v
Force Quadra AV machines to use TV as a monitor
cmd-opt-x-o
Boot from ROM (Mac Classic only)
cmd-opt-a-v
Force an AV monitor to be recognized as one
c
Boot from CD. If set to boot to X and no CD is present, may boot to 9.
d
Force the internal hard disk to be the startup device
n
Hold down until Mac logo, will attempt to boot from network server (using BOOTP or TFTP)
r
Force PowerBooks to reset the screen
t
Put FireWire machine into FireWire Target Disk mode
z
Attempt to boot using the devalias zip from first bootable partition found
ctl-cmd-shift-power
Reset power manager (with computer off)
shift
(Classic only) Disable Extensions
shift
(OS X, 10.1.3 and later) Disables login items. Also disables non-essential kernel extensions (safe boot mode)
cmd
(Classic only) Boot with Virtual Memory off
cmd-v
(OS X only) show console messages (verbose mose) during boot. Also invokes Safe Mode
cmd-s
(OS X only) boot into single user mode
cmd-opt-c-i
(Mac IIci only) Set date to 20 Sep 1989 to get a graphical easter egg
cmd-opt-f-x
(Mac IIfx only) Set date to 19 Mar 1990 to get a graphical easter egg
cmd-opt-shift-tab-delete
Erase startup disk under 7.1(?)
After display of Happy Mac icon
Key Combination
Effect
space
(Classic only) Invoke Extensions Manager
shift
(Classic only) Disable Extensions including MacsBug
(whenever Classic Finder sees a new disk) Rebuild Desktop
opt
(Mac OS 9) Do not open Finder windows
shift
(Mac OS X) Do not launch startup items. Do not open Finder windows when launching Finder. The windows’ states aren’t changed to closed, as they will be reopened if you reboot again.
shift
(Mac OS 9) Do not launch anything from the “Startup Items” folder.
In Finder
Key Combination
Effect
opt-click close box (or cmd-opt-w)
Close all open finder windows (except popup windows)
cmd-shift-opt-w
Close all open finder windows (including popup windows)
cmd-right arrow
Open folder in list view
cmd-opt-right arrow
Recursively open folder and nested folders in list view
cmd-left arrow
Close folder in list view
cmd-opt-left arrow
Recursively close folder and nested folders in list view
cmd-up arrow
Open parent folder. On Mac OS X, when nothing is selected and no windows are open, open User directory
cmd-opt-up arrow
Open parent folder, closing current folder
cmd-opt-shift-up arrow
Make desktop the active window, select parent volume
cmd-down arrow
Open selected item. On Mac OS X, when nothing is selected and no windows are open, open the desktop folder
cmd-opt-down arrow
Open selected item, closing current folder
cmd-opt-o
Open selected item, closing current folder
opt-double-click
Open selected item, closing current folder
opt-click
(In disclosure triangle) expand or collapse all folders within that window
tab
select next icon alphabetically
shift-tab
select previous item alphabetically
cmd-delete
move selection to trash
cmd-shift-delete
empty trash
space
while navigating, opens folder under mouse immediately (with spring-loaded folders enabled)
In Finder Window Menu
cmd-select
Close window
cmd-shift-select
Put away popup window
cmd-opt-select
Expand selected window and close all others
ctl-select
Expand selected window and collapse all others
ctl-opt-select
Activate selected window and expand all others
On disk mount
Key Combination
Effect
md-opt
(whenever Classic Finder sees a new disk) Rebuild Desktop
opt
(Mac OS 9) Add session numbers (;1, ;2, etc) to ISO-9660 CD filenames
opt
(Mac OS X) Show each session on an ISO-9660 CD as a volume
cmd-opt-i
Force-mount ISO-9660 partition of a CD, rather than a Mac partition
After startup
Key Combination
Effect
On machines with a power key
power
Bring up dialog for shutdown, sleep or restart (see next table)
cmd-ctrl-power
Unconditionally reboot (sometimes referred to as “control flower power” to easily remember) (dirty reboot – may corrupt disk)
ctrl-cmd-opt-power
Fast shutdown
cmd-power
Bring up debugger (if debugger installed). Really old macs (mac ii era) needed Paul Mercer’s debugger init to do this, then it got folded into the firmware, around 040 timeframe.
cmd-opt-power
Put late model PowerBooks & Desktops to sleep
cmd-opt-ctrl-power
(PowerBook 500) Reset Power Manager
shift-fn-ctrl-power
(PowerBook G3, G4) Reset Power Manager
On machines without a power key
ctrl-eject
Bring up dialog for shutdown, sleep or restart (see next table)
cmd-ctrl-eject
Unconditionally reboot
ctrl-cmd-opt-eject
Fast shutdown
cmd-eject
Bring up debugger (if debugger installed). Really old macs (mac ii era) needed Paul Mercer’s debugger init to do this, then it got folded into the firmware, around 040 timeframe.
cmd-opt-eject
Put late model PowerBooks & Desktops to sleep
On all machines
cmd-opt-esc
Force quit current app
cmd-shift-0
Put late model PowerBooks & Desktops to sleep No longer work in OS X. On Macs with three floppy drives (Mac SE) they eject the third floppy disk.
cmd-shift-1 or 2
Eject internal or external floppy. Not sure which is which on dual floppy machines (Mac SE, Mac II, etc.)
cmd-shift-3
Screen shot
cmd-shift-4
Abstract user defined area screen shot (hold control while selecting to direct it to the clipboard on Mac OS 9)
cmd-shift-capslock-4
(Classic only) User selectable window screen shot
cmd-ctl-shift-3
Screen shot to clipboard
cmd-ctl-shift-4
Abstract user defined area screen shot to clipboard
cmd-ctl-shift-capslock-4
(Classic only) User selectable window screen shot to clipboard (classic only)
cmd-tab
Switch apps (possible to change key in Mac OS 8-9)
cmd-shift-tab
Switch apps in reverse order
cmd-space
Switch keyboards/script systems (if more than one is installed)
cmd-opt-space
switch through all keyboards in keyboards menu
opt-f3, opt-f4 or opt-f5
bring up the system preferences (Mac OS X only – maybe powerbooks only? only if system preferences isn’t already running)
cmd-f1
toggle between video mirroring and extended desktop mode (works on Ti Powerbooks)
opt-f1
open the displays preference (10.2 and later)
cmd-f2
auto-detect a newly-connected display (works on Ti Powerbooks)
opt-f2
open the displays preference (10.2 and later)
opt-f3, f4, or f5
open the Sounds preference (10.2 and later)
opt-f8, f9, or f10
open the Keyboard and Mouse preference (10.2 and later)
f12
Eject CD/DVD (must be held down on 10.1.2 or later). If the device can be dismounted, it is. If not, nothing happens.
f14
dim display (cubes/g4 iMacs/others?)
f15
brighten display (cubes/g4 iMacs/others?)
cmd-ctl-shift-0
Spin down HD (when possible) on machines running OS 9
cmd-`
cycle through current application’s windows (Mac OS X 10.2 only?)
cmd-~
cycle through current application’s windows (reverse order) (Mac OS X 10.2 only?)
opt-“Empty Trash”
Emptry trash without locked file or contents summary alert. Empties locked items, as well
cmd-opt-D
(Mac OS X only) toggle dock
cmd-opt (when opening chooser)
(Mac OS 9 only) rebuild chooser cache of printer driver information
cmd-opt-ctl-8
(Mac OS X, 10.2 or later) Turn on “Inverse Mode” via accessbility.
cmd-opt-8
(Mac OS X, 10.2 or later) Turn on “Zoom Mode” via accessbility.
cmd-opt-plus
(Mac OS X, 10.2 or later) Zoom In via accessbility.
cmd-opt-minus
(Mac OS X, 10.2 or later) Zoom Out via accessbility.
In the sleep/restart dialog
Key Combination
Effect
S
Sleep
R
Restart
esc
cancel
cmd-. (period)
cancel
Return or Enter
Shut Down
Power
Cancel (9.2.x only?)
In other dialogs
Key Combination
Effect
esc
Cancel
command-. (period)
Cancel
enter
Default button
return
Default button (if there are no text fields that use return
cmd-d
Don’t save (in save/cancel/don’t save dialog)
cmd-r
Replace (in “Do you want to replace this file” dialog, Mac OS X only)
On keyboards with a function key
Key Combination
Effect
fn-backspace
forward delete
fn-left arrow
home
fn-right arrow
end
fn-up arrow
page up
fn-down arrow
page down
Clicks
Click /Modifier
Effect
option-click in another application
Switch to that application and hide previous app
cmd-drag (window)
Drag window without bringing it to front (requires application support to work behind dialogs)
cmd-drag (window background)
Pan contents of window with hand (Finder)
cmd-opt-drag (window background)
Option may be needed to pan contents of window with hand (Finder) on 10.3 and later
cmd-drag (Mac OS X)
Rearrange menu extras
opt-drag (file)
Copy file
cmd-opt-drag (file)
Make alias of file
cmd-click window title
Pop-up menu showing path to current folder/document (in some applications)
option-windowshade
Windowshade all windows of application (classic only)
option-zoom
Zoom window to full-screen
option-yellow
Dock all windows of application (Mac OS X only)
option-green
Zoom window to fill screen (in some applications)
Mac OS X only – items in dock
cmd-click
Reveal in Finder
cmd-opt-click
Activate app and hide other apps
ctl-click (or click and hold)
contextual menu
cmd-drag into dock
Freeze current dock items from moving so icon can be dropped onto an app
cmd-opt-drag into dock
Force application you’re dropping onto to open dropped item
Da diverso tempo mi chiedevo se sarebbe stato possibile collegare in rete il Macintosh Classic, sia per semplificare lo scambio di file, sia per il puro gusto di provare anche questa esperienza!
Questo modello di Mac compatto non è espandibile e non prevedeva l’aggiunta di schede di rete. Su Internet si trovano diverse guide che percorrono strade diverse, a seconda delle possibilità in termini di reperibilità degli accessori necessari e anche di costo (certe rarità te le fanno pagare a prezzi esagerati).
Questa che andrò a descrivere è strada che alla fine ho percorso e che mi ha permesso di collegare il Mac alla Rete.
Partiamo subito dalla caratteristiche tecniche del mio modello: si tratta di un Classic con 4 MB di RAM, hard disk SCSI da 120 MB, floppy 1,44 MB, System 6.0.7 in versione italiana.
Il procedimento consiste nel collegare il Macintosh ad un computer PC Linux tramite la porta seriale che farà da bridge con la rete locale e quindi con quella esterna.
Non sarò estremamente dettagliato nelle spiegazioni, per quello vi rimando a questa ottima guida: Classic Mac Networking dove vengono illustrati i vari metodi, i software e gli accessori hardware per mettere in rete i computer Macintosh. Qui vi potrete fare anche un’idea di quale possa essere la soluzione più adatta alle vostre possibilità.
Collegamento seriale
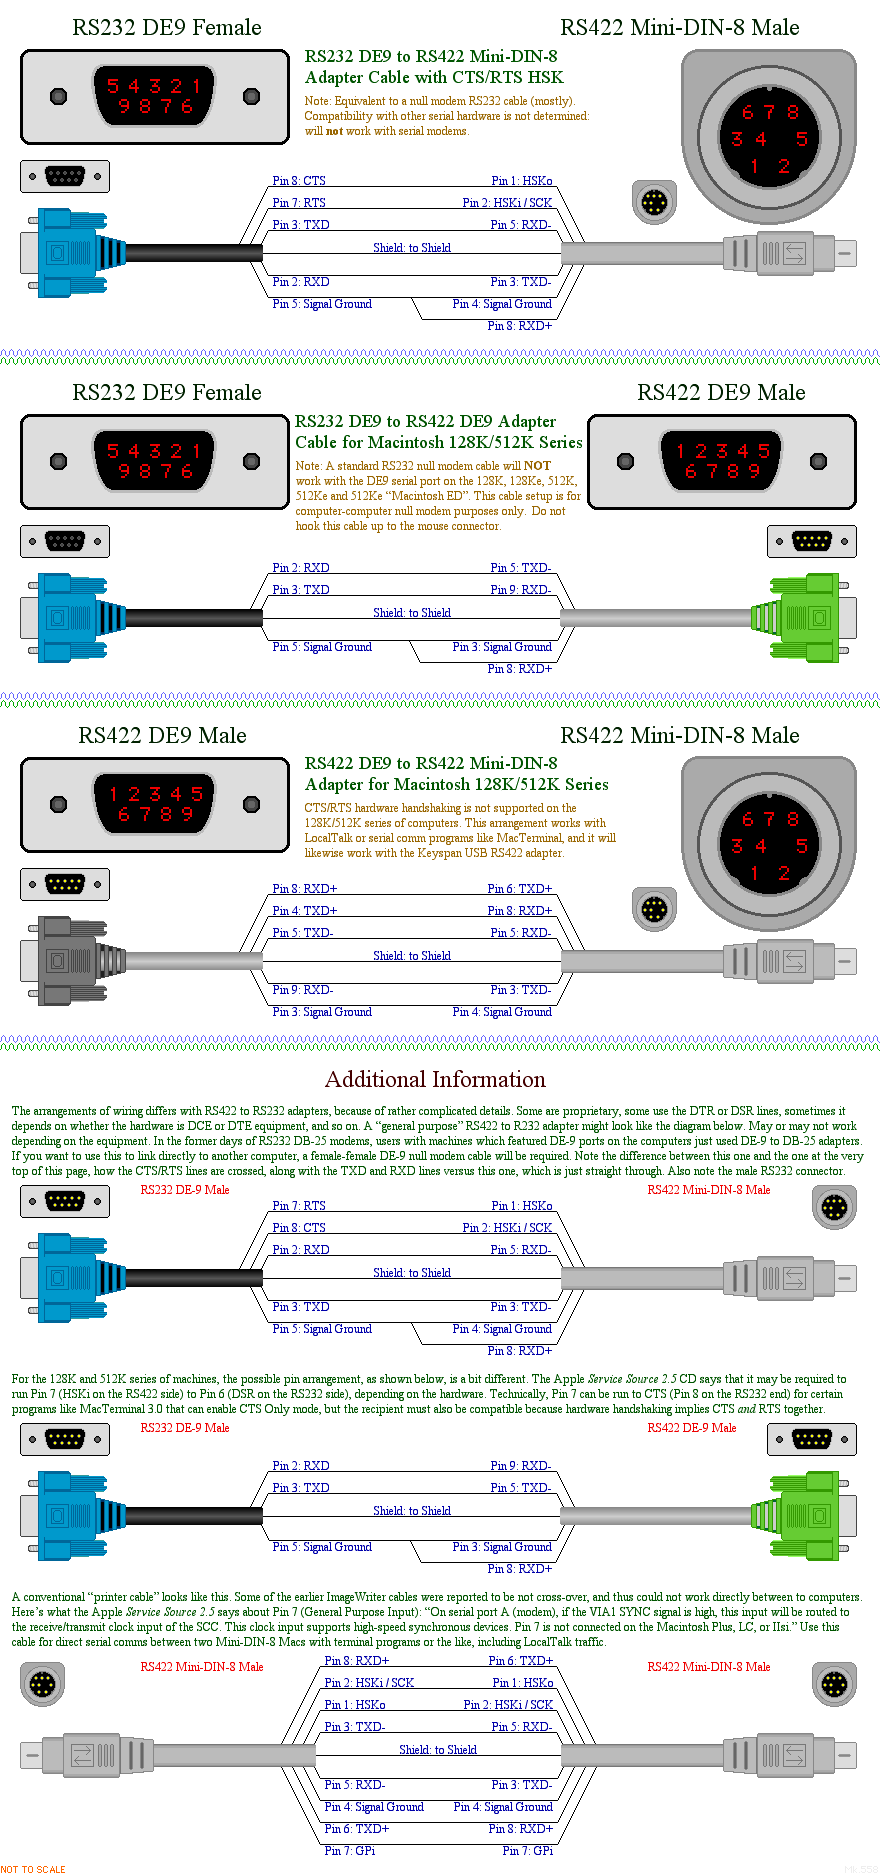
Il Macintosh ha due porte seriali di tipo RS-422 denominate Porta Modem e Porta Stampante. Anche se diversa è comunque compatibile con la più comune RS-232, tuttavia dobbiamo costruirci un cavo adattatore. Per fortuna in rete si trovano molte risorse su come costruirlo (tra cui la guida Classic Mac Networking già citata precedentemente). Così ho seguito lo schema seguente:
Dopo essermi procurato un cavo seriale Mini-DIN-8 maschio (come quelli usati per collegare due Macintosh in rete AppleTalk oppure una stampante ImageWriter) l’ho tagliato e sull’estremità ho montato un connettore DB9 RS-232 femmina, facilmente reperibile nei negozi di elettronica o in rete.
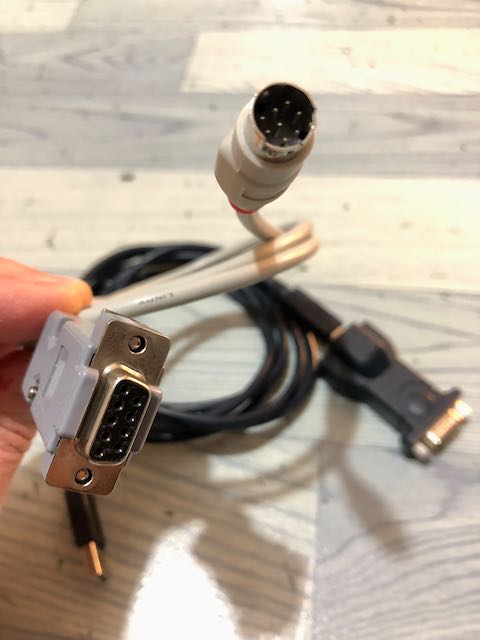
Il mio adattatore Mini-DIN-8 RS-422 <-> DB9 RS-232 auto-costruito.
Dopodiché l’ho subito provato con un semplice programma seriale: ZTerm sul Macintosh e Minicom sul PC Linux. Nel mio caso avevo anche bisogno di adattatore RS-232 <-> USB in quanto il mio PC era troppo recente e non aveva questa tipo di porta. Nonostante ciò ha funzionato fin dal primo momento! Avevo così il mio collegamento fisico. Ora dovevo procedere con la configurazione software.
Configurazione Macintosh
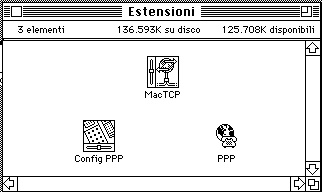
Il System 6.0.7 necessita di alcuni componenti software aggiuntivi: MacTCP 2.0.6 e MacPPP 2.0.1, facilmente reperibili in rete. Dopo averli trasferiti sul Macintosh (io ho potuto contare sul mio LC III dotato di scheda ethernet e quindi già connesso in rete e un floppy disk HD) li ho installati, copiando i 3 file nella Cartella Sistema.
I componenti necessari da copiare nella Cartella Sistema del Macintosh
MacPPP (formato dai due file Config PPP e PPP) soffre di un bug per il quale la cartella Sistema, nelle versioni localizzate e diverse da quella originale inglese, deve essere rinominata in System Folder, altrimenti restituisce un errore quando lo si apre dal Pannello di Controllo.
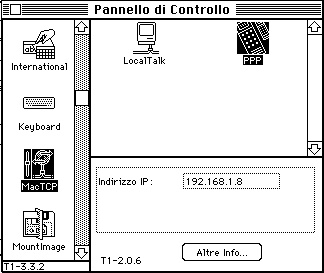
Dopo aver riavviato il Macintosh, si deve procedere alla configurazione, andare nel menù Apple > Pannello di Controllo e assicurarsi che le impostazioni siano come quelle nelle immagini seguenti:
Configurazione di MacTCP e MacPPP
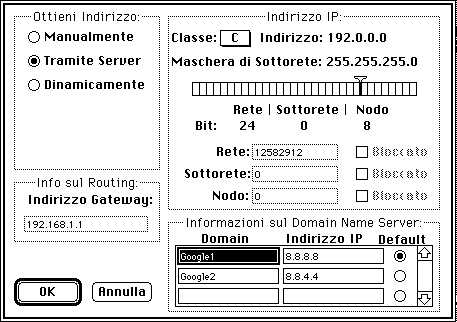
Andare prima nel pannello MacTCP e selezionare PPP come driver principale per la connessione di rete. Cliccando sul pulsante Altre Info… indicare i parametri di rete secondo le caratteristiche della propria rete locale, nel mio caso lascio che sia il server PPP a stabilire l’IP del Macintosh. Inoltre ho indicato quali sono i server DNS da usare per risolvere i nomi di dominio.
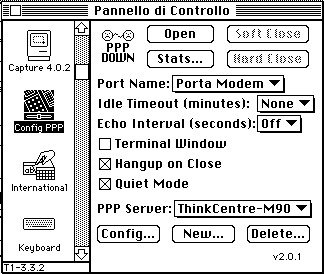
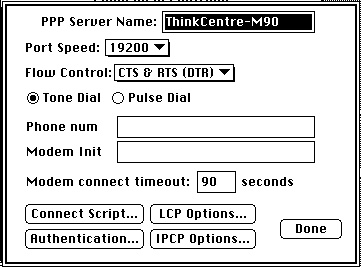
Dopodiché su MacPPP occorre indicare la porta seriale (Porta Modem), la velocità (19200 baud), il controllo di flusso (CTS & RTS). ThinCentre-M90 si riferisce al nome della configurazione, ed è anche il nome del mio PC Linux che mi farà da server PPP.
Una nota per la velocità: bisogna stabilire il parametro ottimale in base alla caratteristiche del Macintosh. Il Classic monta una CPU Motorola 68000 @ 8 MHz: non è proprio una scheggia e io per stare sul sicuro mi sono limitato a 19200, anche se ho fatto anche una prova a 38400. Bisogna andare per tentativi.
Prima di avviare la connessione cliccando sul pulsante Open, bisogna configurare il server PPP.
Configurazione PC
Nel mio caso ho usato un PC con Linux Mint 20.0 (ho letto in giro che non tutte le distribuzioni funzionano correttamente).
L’adattatore USB in mio possesso è un banale FTDI supportato nitidamente dal kernel Linux fin dalla versione 2.6 senza installare driver di terze parti. Sul mio sistema viene visto come /dev/ttyUSB0.
Per prima cosa occorre abilitare il forwarding dei pacchetti di rete da un’interfaccia di rete ad un altra (nel mio caso tra PPP e en0 che la scheda ethernet collegata al mio router).
$ sudo nano /etc/sysctl.conf
e aggiungere o decommentare la seguente riga:
net.ipv4.ip_forward=1
A questo punto occorre assicurarsi che il demone PPP sia presente, altrimenti occorre installarlo scrivendo sul terminale:
sudo pppd esegue il comando con i privilegi di amministratore;
19200 è la velocità in baud che abbiamo deciso di usare;
local persist passive rimane in attesa del client per avviare la connessione;
crtscts è la modalità scelta per il controllo di flusso (hardware in questo caso, in quanto il nostro cavo adattatore ha anche le linee necessarie per questo tipo di modalità, oltre alle linee RX e TX);
192.168.1.246 è l’indirizzo IP locale del PC Linux;
192.168.1.8 è l’indirizzo IP locale assegnato al Macintosh all’avvio della sessione;
noauth non richiede l’autenticazione del client.
La prova finale
A questo punto cliccare sul pulsante Open nel pannello Config PPP sul Macintosh: se va tutto bene viene stabilita la connessione. E’ possibile verificarlo anche nel log dei messaggi sul PC:
$ sudo tail -f /var/log/syslog
e verificare che ci siano dei messaggi come questi:
Feb 27 21:38:52 ThinkCentre-M90 pppd[5870]: pppd 2.4.7 started by mark, uid 0
Feb 27 21:38:52 ThinkCentre-M90 pppd[5870]: Using interface ppp0
Feb 27 21:38:52 ThinkCentre-M90 pppd[5870]: Connect: ppp0 <--> /dev/ttyUSB0
Feb 27 21:39:10 ThinkCentre-M90 pppd[5870]: found interface eno1 for proxy arp
Feb 27 21:39:10 ThinkCentre-M90 pppd[5870]: local IP address 192.168.1.246
Feb 27 21:39:10 ThinkCentre-M90 pppd[5870]: remote IP address 192.168.1.8
Ho aperto quindi l’applicazione MacTCP Ping e provato a spingare il server web di Google, attendo risposta!
Risposta da Google alle richieste di ping del Macintosh
A questo punto è possibile, ad esempio, utilizzare un programma client per collegarsi ad un server FTP e trasferire file.
I’m hosting the old Apple Support Area FTP archive dated from november 2012, which contains the Apple Software Updates and the Disability sections of the Apple Support Area on ftp.download.info.apple.com before that FTP service was shut down.
Hoping this initiative doesn’t hurt the sensibility of anyone nor violating any legal copyright, I’d like to share this to anyone could need them for their loving retromac devices.
The FTP archive is available for web browsing here.
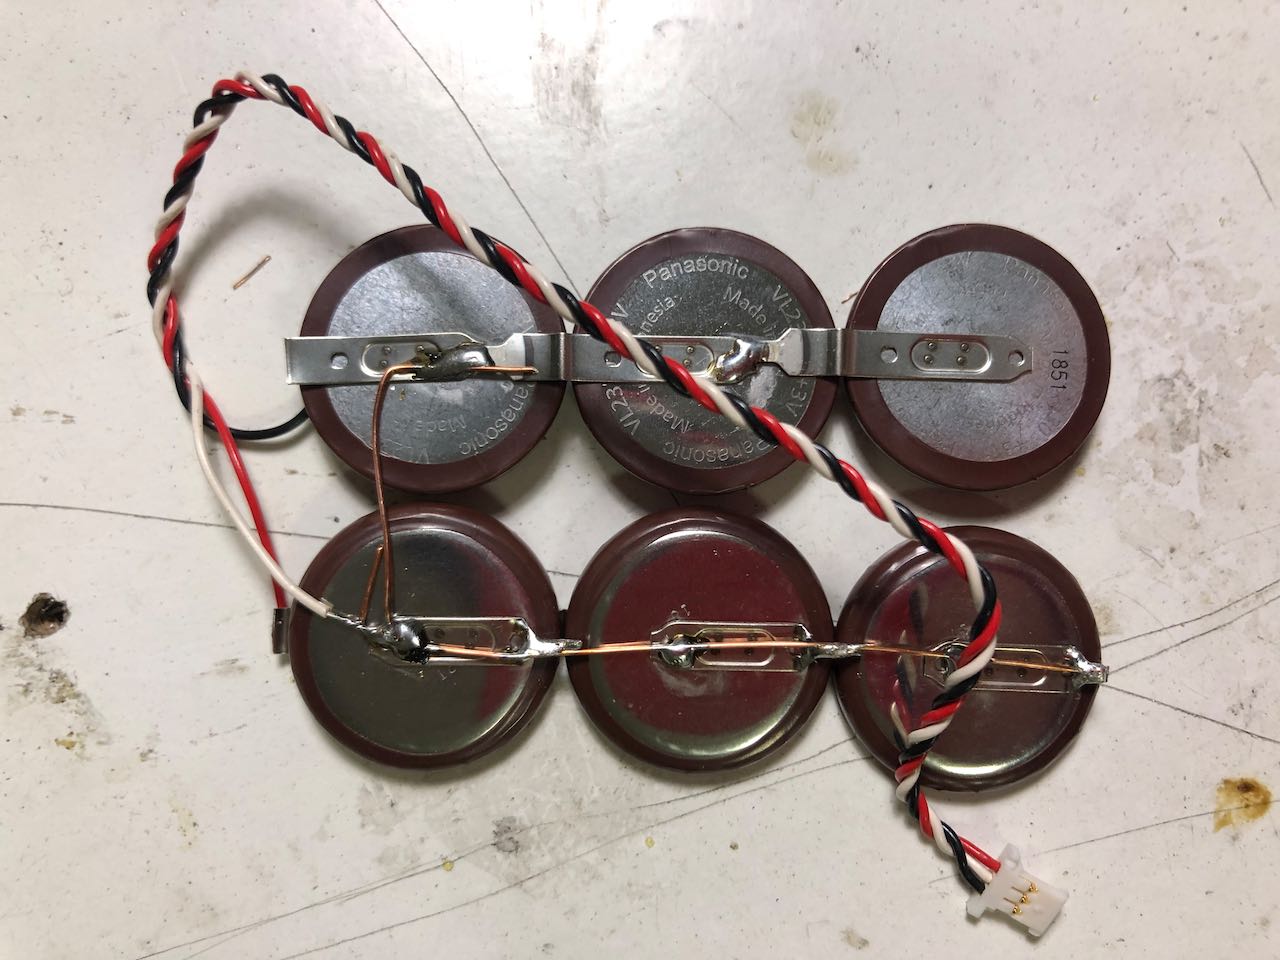
Di recente sono diventato il possessore di un PowerBook G3 Series in buone condizioni e completo di accessori (batteria, modulo floppy e lettore CD-ROM).
Purtroppo la batteria della PRAM era esausta e non teneva più la carica. Ciò comportava il problema di dover ogni volta reimpostare l’orologio e altre impostazioni. Questo PowerBook usa per la PRAM un tipo di batteria che non si trova più in commercio, eccetto per qualche fondo di magazzino dai costi proibitivi, oltre al dubbio possa funzionare ancora data l’obsolescenza.
Cercando in giro mi sono imbattuto su un forum dove un utente asseriva che la batteria altro non è che un gruppo di 6 pile a bottone del tipo Panasonic VL-2330 ancora in produzione e acquistabili sui principali siti di vendita materiale elettronico.
Così ho voluto verificare di persona e, dopo aver smontato il mio PowerBook seguendo le linee guida del Service Manual, ho scoperto che era proprio così: il packaging è composto da 6 batterie collegate in un certo modo.
Perciò ho acquistato le nuove batterie e, armato di saldatore e filo di stagno, le ho collegate tra loro basandomi sull’osservazione di quella originale. L’ho collegata, ho richiuso il tutto e con grande gioia non solo il mio PowerBook non si è bruciato, ma riesce ora a mantenere l’ora e tutte le altre impostazioni quando stacco l’alimentatore.
La Panasonic VL-2330 è una batteria al litio ricaricabile da 3V e secondo quanto riportato dal manuale del PowerBook, necessita di rimanere collegato alla rete elettrica per almeno 48h prima di raggiungere la piena carica.
Original article from the site project for History 262S (Spring Quarter 98-99) at Stanford University. Comments or questions should be sent to the author, John Fu, at hapgood@leland.stanford.edu
Special thanks to Henry Lowood of Stanford University Libraries and Prof. Timothy Lenoir.
The histories of Apple Computer and the floppy drive have been intertwined ever since Steve Wozniak hacked together a workable floppy drive controller hours before the start of the 1978 Consumer Electronics Show in Las Vegas.
In this site, we will explore how Apple’s choice of the floppy as the storage medium of choice for the Apple II and later, the original Macintosh influenced the development of floppies as an industry standard.
We will follow Apple’s use of the floppy up to May 1998, when the company’s dramatic omission of the floppy drive in the iMac demonstrated the ultimate rejection of the floppy as a viable method of data storage.
Origins of the Floppy Drive
The floppy drive was first conceived in 1967 at IBM’s San Jose Research and Engineering Laboratory in a project headed by David Noble. The technology’s initial purpose was “to store the computer’s initial control program, as well as to hold the machine’s microprogram” for IBM’s System/370 line of mainframes. (Ceruzzi, p. 232) Aside from their enormous size (8 inches), the first commerically available floppies from IBM, announced in 1971, were remarkably similar to the floppies of today in construction, consisting of “a thin plastic substrate coated on both sides” that was “permanently sealed in a protective envelope.” (Kean, p. 84)
Within a few years, the floppy disk and drive began making their way into other IBM systems and from there, other companies’ systems. By the late 70s, 8- and 5.25-inch floppy disk drives were available for minicomputers like the Altair as kits or fully assembled; however, exorbitant prices (as much as $1649) and the lack of a formatting standard prevented their widespread adoption. (Haddock, pp. 221, 223) Some form of permanent storage was desperately needed, as hobbyists were otherwise forced to type in programs by hand every time they wanted to run them.
Tape drives provided a much more affordable option for hobbyists at the time, but the tape’s ponderous performance and lack of random access were less than ideal. Steve Wozniak had developed an cassette tape drive interface for the Apple II, but as Gary Kildall of Digital Research wrote:
“The cassette system is particularly frustrating. I used two different recorders and found them both equally unreliable. . . I must consider the backup storage system as low-end hobbyist grade.” (Moritz, pp. 209-210)
Clearly a better storage solution was needed to propel the personal computer (and Apple) into the big leagues.
Woz’s Floppy Drive Miracle
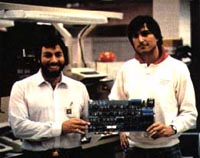
Apple was well aware of the shortcomings of cassette tape storage and sought out Shugart to supply floppy drives for Apple systems. The missing link for Apple II floppy support was a floppy drive controller card. The company turned to its resident genius and co-founder, Steve Wozniak, to design the card.
Woz and Jobs with the Apple I
Woz began reading technical manuals on drives but made little progress on the controller until December 1977 when Mike Markkula made the floppy drive Apple’s top priority. Woz then made the project the center of his existence, setting his sights on producing a working prototype by the time of the Consumer Electronics Show (CES) in Las Vegas in January 1978.
With a seemingly impossible time constraint and little previous experience in drive design, Wozniak and Randy Wigginton went to work on the hardware and software for the controller. Woz turned on “his inimitable electronic brew, the Wozniak alchemy” and in two weeks of nearly continuous labor created a brilliant drive controller design that used far fewer chips than the competition. (Garr, pp. 102-103) At CES, the design impressed both passers-by, competitors, and even Woz himself, who called the controller “the favorite design of my life.” (Moritz, p. 210)
The Apple IIe with single Disk II
The controller pushed Apple to the forefront of the nascent PC industry by spurring sales, encouraging software development, and creating a huge backlog of orders for Apple’s 5.25-inch floppy drives. In 1982, IBM released its IBM PC with a 5.25-inch floppy drive, further establishing the floppy as the standard in personal computing data storage.
Lisa, the Apple III, and the Twiggy Fiasco
With the phenomenal success of the Apple II and the impending Apple Computer IPO, the company faced enormous expectations for its next two computers, the Apple III and the Lisa. Both machines were ultimately doomed to failure.
The Apple III, introduced at Disneyland during the National Computer Conference in May 1980, combined enhanced capabilities with backward compatibility with programs designed for the II. Unfortunately, the machine, code-named Sara, was released with the same processor as the Apple II, no clock chip, rushed software and manuals, and major design issues resulting in a huge failure rate. Consequently, the Apple III, even after a relaunch in late 1981, never attained the success of its predecessor.
Lisa, like Sara, was targeted at business users. Influenced by Larry Tessler’s groundbreaking work on Smalltalk for the Xerox Alto at Xerox PARC, the Lisa team designed the machine with a mouse-driven interface and bitmapped graphics. Despite these advances, Lisa was laden with a gargantuan $10,000 price far beyond the financial reach of most users.
The LISA
Both the Apple III, Lisa, and Macintosh were originally slated to include a 5.25-inch floppy drive called Twiggy. Woz’s brilliant design for the Apple II had shown that Apple could build its own drive controllers. Steve Jobs believed that Apple could take the next step and produce its own drives, exemplifying the company’s boast that anything “Not Invented Here” (or “NIH”) wasn’t worth using. (Young, p. 295)
The Twiggy group soon encountered design difficulties that precluded its inclusion in the Apple III and led to serious problems with manufacturing and reliability. The Apple III shipped instead with the older 143 kb Shugart-supplied floppy drive while the Lisa originally carried two of the cursed 871 kb Twiggy drives. Twiggy’s fate was sealed when the both the Macintosh and Lisa 2 were introduced in 1984 with a single 400k 3.5-inch floppy drive designed by Sony.
Mass storage and the Macintosh Project
The project that would become Macintosh originally went by the code name Annie. But “to avoid using only female names on projects,” the name was changed to Macintosh “because the project leader’s [Jef Raskin] favorite Apples are Macintosh Apples.” (Macintosh Project Papers, Doc. 1)
Conceived by Raskin as “a computer designed for the Person In The Street (or, to abbreviate: the PITS)”, the Mac would have “a 4 or 5 inch CRT…, a keyboard, and a disk integrated into one package” at the amazing price point of $500. (MPP, Doc. 4) By “disk” Raskin specifically meant a floppy disk, stating in October 1979 that “In the Macintosh time frame, the only viable mass storage is floppy disks.” (MPP, Doc. 7) As the project progressed, however, Raskin found it difficult to include all that he wanted into the computer given component prices at the time. The floppy drive was particularly problematic to the Mac team:
“But even a single floppy disk drive (which currently would add over $200 to the end-user price) is too expensive for Macintosh).” (MPP, “Progress Report of July 1980”)
Raskin explored other storage options, including a combination dot-matrix printer/bar code reader:
“On the 14th of this month I was trying to find a less expensive mass storage device for the Macintosh project. The bar-code reading wand is one of the least expensive computer input devices, but is limited by the operator’s dexterity. … Any low cost printer would have to be a dot matrix based device given the present state of the art. I realized that such a printer could print bar codes.” (MPP, Doc. 15)
By July 1980, the team believed that their best bet might be a digital cassette drive:
“A digital cassette system will have a cost of about $35, is the least expensive alternative–and is acceptable so long as it is not used for system software swapping.” (MPP, “Progress Report of July 1980”)
The Macintosh Project Papers reveal that Raskin was willing to sacrifice some functionality in order to meet a lower price goal. His attitude contrasted sharply with that of Steve Jobs, who according to Raskin, told the Mac team, “Don’t worry about price, just specify the computer’s abilities.” (MPP, Doc. 8) Raskin’s response to Jobs was blunt: “Starting with the abilites desired is nonsense. We must start with a price goal, a set of abilities, and keep an eye on today’s and the immediate future’s technology. These factors must all be judged simultaneously.” (MPP, Doc. 8)
Nonetheless, the projected price of Macintosh rose from $500 in September 1979 to “under $1,500” in July 1980. (MPP, “Progress Report of July 1980”) Steve Jobs increased his involvement with the Macintosh after being forced out of the Lisa group in September 1980. Tensions increased as Jobs appointed himself general manager of the Mac team and declared Raskin publications director of the project that he had created. (Young, p. 211-2) Frustrated and disillusioned, Raskin left the Macintosh group in February 1981. Jobs’ attitude on features versus pricing clearly had its effect on the Macintosh project, as the final product included a floppy drive and sold for a whopping $2495, five times Raskin’s original goal.
A Floppy for Macintosh
With Twiggy on the verge of meltdown, the Macintosh team needed to find a floppy drive for the Mac. Fast. Since management had already committed to the 1984 ad campaign, the Macintosh had to be completed by the start of the year. Steve Jobs met with a number of Japanese drive manufacturers to find a replacement and chose an 5.25-inch Alps prototype over a 3.5-inch Sony design, against the recommendation of Dave Vaughan, who was responsible for the manufacturing of the Mac.
Bob Belleville, engineering manager of the Macintosh group, secretly brought Hidetoshi Komoto, the inventor of the Sony design, to Apple while Alps floundered in its attempts to produce a working drive. As Michael Malone describes in Infinite Loop:
“For the next week, Bandley 6 resembled a French farce, with Komoto whisked away into a far cubicle whenever Jobs appeared, and then dragged out for hurried meetings whenever Jobs was gone. Komoto for his part never seemed to have understood why he was regularly yanked into corners.” (Malone, p. 315)
With the 1984 deadline approaching and no Alps drives in sight, Belleville revealed the Sony alternative, making possible the Mac’s release in January 1984. The hard-shelled 3.5-inch disks became the standard for the Macintosh and (in later, higher-capacity incarnations) for the entire PC industry. In January 1986, the Mac Plus was released with an 800 kb 3.5-inch floppy drive; in September 1988, the Mac IIx shipped with a built-in SuperDrive capable of using 1.44 MB high-density floppy disks.
Manual vs. Auto Eject: The Great Floppy Debate
The Macintosh, from the Mac 128k up until the Quadra 605, included floppy drives that featured auto-inject and auto-eject. Auto-inject sucks the disk out of your hand into the drive if you push the disk in most of the way. Auto-eject ejects the disk from the drive when the user drags the disk icon to the trash in the Finder. IBM PC-compatibles, in contrast, have never offered either of these features, forcing users to push the disks all the way into the drive and press a button on the drive to manually eject the disk.
The origin of auto-eject can be attributed to Steve Jobs conception of the Macintosh as a “crankless Volkswagen” that runs “a system which is generally intuitive to users.” (Young, p. 245) In the Finder of the Macintosh operating system, the icon of a floppy disk appears when a disk is inserted. When the user is finished working with the disk, she drags the floppy icon to the trash, and the disk is ejected. Auto-eject completes the metaphor of the desktop, providing the user with a consistent experience.
In DOS on PC-compatible systems, inserting a floppy disk results in no immediate visual feedback. (Even in Windows 9x/NT, the floppy drive icon remains visible whether or not a disk is inserted.) The user must type the highly intuitive “cd A:” in order to even access the contents of the floppy disk. PC users often argue that the manual eject offers them the freedom to remove their disk whenever they please; however, this freedom can be quite dangerous when new users try to eject a floppy while it is being written to or read from. Auto-eject, therefore, is not only a means of consistency, but also of preventing potentially catastrophic user error.
The manual-inject Quadra 605
Auto-inject, while arguably less important to the user experience than auto-eject, also provides a certain intangible elegance to using a Macintosh. Auto-inject was included with every Mac model with a built-in floppy drive (except for the PowerBooks, which presumably sacrificed elegance for battery life) up to the Quadra 605, released in October 1993. The elimination of auto-inject came at a time when Apple was struggling to compete with low-cost PC clones. Removing auto-inject and cutting other costs allowed Apple to sell the speedy Quadra 605 for a mere $900. Auto-eject, however, remained a hallmark of all Macintosh floppy drives until they were eliminated completely from the Macintosh line.
iMac and the End of an Era
On May 6, 1998, Apple made two product announcements that spelled the beginning of the end for the floppy drive in Macintosh computers.
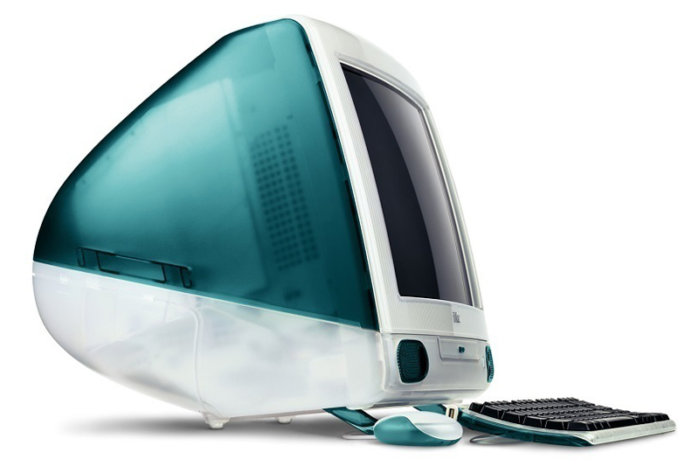
The original iMac G3
The first was the iMac, a powerful G3 Mac in an approachable blue case. The machine instantly took the national spotlight as the cool technology du jour, but Apple immediately drew flak for excluding features traditionally found on Macs such as serial ports, a SCSI port, an ADB port, and a floppy drive. The lack of a floppy drive spurred a plenitude of media and public criticism of Apple’s apparent foolishness. Members of the Mac media (including myself) struck back with articles demonstrating the increasing irrelevance of a 1.4 MB floppy in a world of 100 MB Zip disks, 600 MB CD-ROMs, and 4 GB hard drives.
PowerBook G3 Series
The other announcement of the day was of the PowerBook G3 Series. The notebook’s large screen, sleek styling, and speedy performance garnered most of the attention, but few took interest in the fact that the PowerBook G3 Series was Apple’s first full-size notebook computer sold without a floppy drive. As Henry Bortman wrote in Macworld’s June 1998 issue, “Curiously, a floppy-disk drive is optional, but you’d be ill-advised to leave it out.” The exclusion of the floppy drive on the PowerBook was not merely a “curious” decision, but an intentional move by Apple to phase out the use of floppies in Macintosh computers.
The ostensible arrogance of Apple’s decision may be explained through its popular “Think Different” television ad:”About the only thing you can’t do is ignore them. Because they change things. They push the human race forward. And while some may see them as the crazy ones, we see genius. Because the people who are crazy enough to think they can change the world are the ones that do. “
Apple clearly sees itself as much more than just a computer company. By dumping technologies that it perceives as obsolete (like the floppy drive) in favor of the latest innovations, the company attempts to assert itself as an agent of technological progress.
Bibliography
Ceruzzi, Paul E. A History of Modern Computing. Cambridge, Mass.: The MIT Press, 1999.
Garr, Doug. Woz: The Prodigal Son of Silicon Valley. New York: Avon Books, 1984.
Haddock, Thomas F. A Collector’s Guide To Personal Computers And Pocket Calculators. Florence, Alabama: Books Americana, 1993.
Kean, David W. IBM San Jose: A Quarter Century of Innovation. 1977.
Kunkel, Paul. AppleDesign: The Work of the Apple Industrial Design Group. New York: Graphis Inc., 1997.
Malone, Michael S. Infinite Loop: How the world’s most insanely great company went insane. New York, Currency Doubleday, 1999.
Moritz, Michael. The Little Kingdom: The Private Story of Apple Computer. New York: William Morrow and Company, Inc., 1984.
Pogue, David. and Joseph Schorr. Macworld Mac Secrets, 5th Edition. Foster City, CA: IDG Books Worldwide, Inc., 1999.
Raskin, Jef. The Macintosh Project: Selected Papers. 1980.
Young, Jeffrey S. Steve Jobs: The Journey Is The Reward. New York: Lynx Books, 1988.